
Hi Dude. Today will install Unbound DNS Resolver in ubuntu 20.04/22.04 wih compile from source installer. As we know, Unbound is a validating, recursive, caching DNS resolver. It is designed to be fast and lean and incorporates modern features based on open standards.
Unbound runs on FreeBSD, OpenBSD, NetBSD, MacOS, Linux and Microsoft Windows, with packages available for most platforms. It is included in the base-system of FreeBSD and OpenBSD and in the standard repositories of most Linux distributions. Installation and configuration is designed to be easy. Setting up a resolver for your machine or network can be done with only a few lines of configuration.
It is free, open source software under the BSD license.
Download From Repository.
wget https://nlnetlabs.nl/downloads/unbound/unbound-latest.tar.gz
tar xzf unbound-latest.tar.gz
We’ll need some tools, such as a compiler and the make program.
sudo apt update
sudo apt install -y build-essential libssl-dev libunbound-dev libevent-dev libexpat1-dev libldns-dev net-tools bind9-utils
The library components Unbounds needs are: libssl libexpat, of which we need the “dev” version. Unbound also uses libldns, but this is included in the tarball we’ve already downloaded.
sudo apt install -y libssl-dev
sudo apt install -y libexpat1-dev
We’ll also need the tools to build the actual program. For this, Unbound uses make and internally it uses flex and yacc, which we need to download as well.
sudo apt-get install -y bison
sudo apt-get install -y flex
With all the requirements met, we can now start the compilation process in the Unbound directory. The first step here is configuring. With ./configure -h you can look at the extensive list of configurables for Unbound. A nice feature is that configure will tell you what it’s missing during configuration. A common error is for the paths to the two libraries we just installed, which can be manually specified with --with-ssl= and --with-libexpat=.
Install Unbound in Ubuntu With Compile
change to directory folder from result extract.
cd unbound-1.16.1./configure --with-libeventWhen configure gives no errors, we can continue to actually compiling Unbound. For this Unbound uses make. Be warned that compiling might take a while.
make When we have a successful compilation, we can install Unbound to make available for the machine. Lets install unbound in ubuntu with compile package.
sudo make installPlease note that the default configuration file is located at /usr/local/etc/unbound/unbound.conf and created during the make step. This file contains all possible configuration options for Unbound.
After install finished, add user “unbound”.
groupadd unbound
useradd -d /usr/local/etc/unbound -m -g unbound -s /bin/false unbound
Testing
A simple test to determine if the installation was successful is to invoke the unbound command with the -V option, which is the “version” option. This shows the version and build options used, as well as proving that the install was successful.
root@habibza:/usr/local/etc/unbound# unbound -V
Version 1.16.1

Configure line: --with-libevent
Linked libs: libevent 2.1.11-stable (it uses epoll), OpenSSL 1.1.1f  31 Mar 2020
Linked modules: dns64 respip validator iterator

BSD licensed, see LICENSE in source package for details.
Report bugs to [email protected] or https://github.com/NLnetLabs/unbound/issues
Set up Remote Control
Next, do unbound-control-setup. A useful functionality to enable is the use of the unbound-control command.
unbound-control-setupThis creates a number of files in the default install directory. The default install directory is /usr/local/etc/unbound/.
If you use a username like unbound in the config to run the daemon (which is the default setting), you can use sudo to create the files in that user’s name.
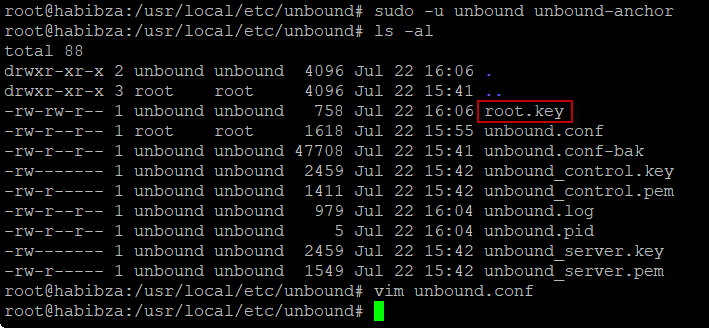
sudo -u unbound unbound-control-setupif get error permission, give ‘chown -R unbound:unbound /usr/local/etc/unbound’
cd /usr/local/etc/unbound/

ls -al
drwxr-xr-x 3 root    root     4096 Jul 22 15:41 ..
-rw-r--r-- 1 unbound unbound 47708 Jul 22 15:41 unbound.conf
-rw------- 1 unbound unbound  2459 Jul 22 15:42 unbound_control.key
-rw-r----- 1 unbound unbound  1411 Jul 22 15:42 unbound_control.pem
-rw-r--r-- 1 unbound unbound     6 Jul 22 15:45 unbound.pid
-rw------- 1 unbound unbound  2459 Jul 22 15:42 unbound_server.key
-rw-r----- 1 unbound unbound  1549 Jul 22 15:42 unbound_server.pem
Add this line, in unbound.conf.
remote-control:
        # enable remote-control
        control-enable: yes

        # location of the files created by unbound-control-setup
         server-key-file: "/usr/local/etc/unbound/unbound_server.key"
         server-cert-file: "/usr/local/etc/unbound/unbound_server.pem"
         control-key-file: "/usr/local/etc/unbound/unbound_control.key"
         control-cert-file: "/usr/local/etc/unbound/unbound_control.pem"
Or we can backup our original file unbound.conf, and create new file unbound.conf with this configuration
Starting Unbond
Lets start unbound with unbound-control start. The first time I did an unbound start, I got a failure. Because port 53 is already used by systemd-resolved.service.
root@habibza:/usr/local/etc/unbound# unbound-control start
[1658480141] unbound[20950:0] error: can't bind socket: Address already in use for 0.0.0.0 port 53
[1658480141] unbound[20950:0] fatal error: could not open ports
We can check port with netstat.
root@habibza:/usr/local/etc/unbound# netstat -tulpn
Active Internet connections (only servers)
Proto Recv-Q Send-Q Local Address           Foreign Address         State       PID/Program name
tcp        0      0 127.0.0.53:53           0.0.0.0:*               LISTEN      817/systemd-resolve
tcp        0      0 0.0.0.0:22              0.0.0.0:*               LISTEN      886/sshd: /usr/sbin
tcp6       0      0 :::22                   :::*                    LISTEN      886/sshd: /usr/sbin
udp        0      0 127.0.0.53:53           0.0.0.0:*                           817/systemd-resolve
As we see, port 53 taken by systemd-resolve.
This is because Ubuntu 20.04 shipped with systemd-resolved.service for resolver service. So i have to stop systemd-resolved.service.
systemctl stop systemd-resolved.service
systemctl disable systemd-resolved.service
Next remove file /etc/resolv.conf, because that symlink file associated with systemd-resolved.service

Next, we have to delete /etc/resolv.conf and add new file
rm -rf /etc/resolv.confAdd new file /etc/resolv.conf, fill with line nameserver 127.0.0.1.
vim /etc/resolv.conf

nameserver 127.0.0.1
Set up Trust Anchor (Enable DNSSEC)
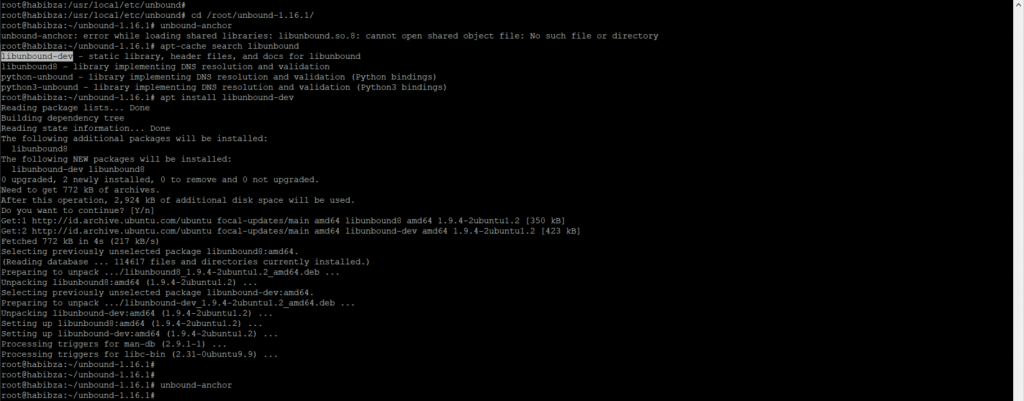
sudo -u unbound unbound-anchorWith command above, create the root key file on /var/lib/unbound/root.key or /usr/local/etc/unbound/root.key.
When get error, libunbound.so.8 not found, we must installed package libunbound-dev.
To enable DNSSEC, we add auto-trust-anchor-file under the server clause in the config.
server:
        # enable DNSSEC
        auto-trust-anchor-file: "/var/lib/unbound/root.key"
If you were going to use this Unbound server as an authoritative DNS server, you would also want to make sure you have a root hints file, which is the zone file for the root DNS servers.
Get the file from InterNIC. It is easiest to download it directly where you want it. My preference is usually to go ahead and put it where unbound directory installed:
wget https://www.internic.net/domain/named.root -O /usr/local/etc/unbound/root.hintsThen add an entry to your unbound.conf file to let Unbound know where the hints file goes:
# file to read root hints from.
        root-hints: "/usr/local/etc/unbound/root.hints"
Finally, we want to add at least one entry that tells Unbound where to forward requests to for recursion. Note that we could forward specific domains to specific DNS servers. In this example, I’m just going to forward everything out to a couple of DNS servers on the Internet:
forward-zone:
        name: "."
        forward-addr: 1.1.1.1
        forward-addr: 8.8.8.8
This is my latest configuration.
My Server Spec is: CPU : 2 Core, Memory: 8GB.
# some optimisation options.
server:

	#show log and statistic
	verbosity: 1
	statistics-interval: 120
	logfile: "/usr/local/etc/unbound/unbound.log"
	use-syslog: no

	# use all CPUs
    	num-threads: 2

   	# power of 2 close to num-threads
   	msg-cache-slabs: 2
   	rrset-cache-slabs: 2
   	infra-cache-slabs: 2
	key-cache-slabs: 2

   	 # more cache memory, rrset=msg*2
   	 rrset-cache-size: 100m
 	 msg-cache-size: 50m

  	  # more outgoing connections
  	  # depends on number of cores: 1024/cores - 50
  	  outgoing-range: 450
 	  num-queries-per-thread: 250

  	  # Larger socket buffer.  OS may need config.
  	  so-rcvbuf: 4m
  	  so-sndbuf: 4m

   	 # Faster UDP with multithreading (only on Linux).
   	 so-reuseport: yes

         directory: "/usr/local/etc/unbound"
         username: unbound
         chroot: "/usr/local/etc/unbound"
         pidfile: "/usr/local/etc/unbound/unbound.pid"
         root-hints: "/usr/local/etc/unbound/root.hints"
         interface: 0.0.0.0
	hide-identity: yes
	hide-version: yes
	harden-glue: yes
	do-not-query-address: 127.0.0.1/8
	do-not-query-localhost: no

        access-control: 10.0.0.0/8 allow
	access-control: 192.168.0.0/16 allow
	access-control: 0.0.0.0/0 deny

	forward-zone:
    		name: "."
    		forward-addr: 8.8.8.8
		forward-addr: 1.1.1.1

remote-control:
	control-enable: yes
	control-interface: 127.0.0.1
	control-port: 953
	server-key-file: "/usr/local/etc/unbound/unbound_server.key"
	server-cert-file: "/usr/local/etc/unbound/unbound_server.pem"
	control-key-file: "/usr/local/etc/unbound/unbound_control.key"
	control-cert-file: "/usr/local/etc/unbound/unbound_control.pem"
Unbound can use it to efficiently use more than 1024 file descriptors. Install libevent (and libevent-devel, if it exists) with your favorite package manager. Before compiling unbound run ./configure --with-libevent.
Now you can give any number you like for outgoing-range. Also increase the num-queries-per-thread value.
# with libevent
outgoing-range: 8192
num-queries-per-thread: 4096
Testing
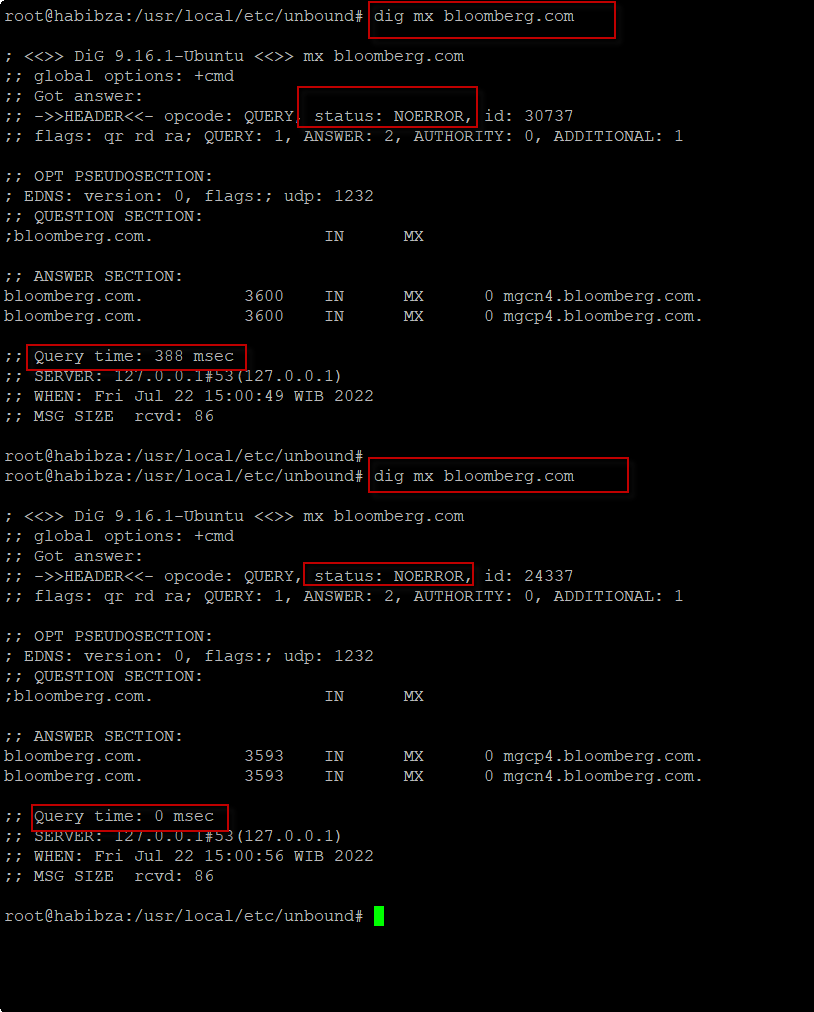
We can testing with dig command. For example dig mx bloomberg.com or domain else you want. First result, get query time 388 msec. Second result get query time 0 msec. That unbound work for caching dns.

See Statistics
We can easy see statistics unbound with unbound-control stats.
root@habibza:/usr/local/etc/unbound# unbound-control stats
thread0.num.queries=0
thread0.num.queries_ip_ratelimited=0
thread0.num.cachehits=0
thread0.num.cachemiss=0
thread0.num.prefetch=0
thread0.num.expired=0
thread0.num.recursivereplies=0
thread0.requestlist.avg=0
thread0.requestlist.max=0
thread0.requestlist.overwritten=0
thread0.requestlist.exceeded=0
...
Ok, done. That is short article about install unbound in ubuntu with compile method. Next article is Install Unbound Ubuntu 20.04/22.04 With Package Manager. I hope this is useful for you.
Let's Buy Me Coffee.https://saweria.co/habibzain https://ko-fi.com/habibzain