Zimbra is a widely used collaboration platform that provides robust email services. When it comes to improving email deliverability and ensuring the security of your outgoing messages, integrating Zimbra Relay Amazon Simple Email Service (SES) using authentication is a prudent choice. This guide will walk you through the seamless process of setting up Zimbra to relay through Amazon SES with authentication.
Basically Zimbra uses Postfix as the main engine as a Mail Transport Agent (MTA). So we can follow official documentation from AWS SES for generate user password that will used authentication.
To set up Zimbra to relay emails through Amazon SES (Simple Email Service) with authentication, you’ll need to configure the Zimbra server to use Amazon SES SMTP servers and provide the necessary authentication credentials. Here are the general steps you can follow:
Step 1: Obtain Amazon SES Credentials
- Access AWS Console: Log in to your AWS Management Console and navigate to the Amazon SES service.
- Create SMTP Credentials: Generate SMTP credentials in the SES console. This will provide you with an SMTP username and password. Save Access key.

- Create Identity. Fill with Email Address or Domain.


See Also: Things to do After Install Zimbra
Step 2: Configure Zimbra Relay Amazon SES
- SSH into your Zimbra Server and Login as Zimbra User.
Connect to your Zimbra server using SSH.
[root@mail ~]# su - zimbra- Create a relay_password file containing the relay server, username and password.
echo email-host user_access_Key:Password_or_token > /opt/zimbra/conf/relay_passwordIn our server example like this:
echo email-smtp.ap-southeast-1.amazonaws.com GFKJHGFDOFCDFGHJKHJXV:BGXIljxSDeNU+Ew9Tj2Ufghjkl567890dcvxcvbjhgfdsertyui > /opt/zimbra/conf/relay_password- Postmap lookup table relay_password.
postmap /opt/zimbra/conf/relay_passwordMake sure with ls -al.
ls -al /opt/zimbra/conf/relay_password*
-rw-r----- 1 zimbra zimbra   106 Nov  7 17:00 /opt/zimbra/conf/relay_password
-rw-r----- 1 zimbra zimbra 12288 Nov 7 17:01 /opt/zimbra/conf/relay_password.lmdb- Check whether the postfix lookup table correctly contains the username and password.
postmap -q email-smtp.ap-southeast-1.amazonaws.com /opt/zimbra/conf/relay_password
#result like this
GFKJHGFDOFCDFGHJKHJXV:BGXIljxSDeNU+Ew9Tj2Ufghjkl567890dcvxcvbjhgfdsertyui- Configure Zimbra Postfix to use the new folder password.
zmprov ms `zmhostname` zimbraMtaSmtpSaslPasswordMaps lmdb:/opt/zimbra/conf/relay_password- Configure zimbra postfix to use SSL authentication.
zmprov ms `zmhostname` zimbraMtaSmtpSaslAuthEnable yes- Configure postfix to use an external servername:
zmprov ms `zmhostname` zimbraMtaSmtpCnameOverridesServername no- Enable the use of tls security
zmprov ms `zmhostname` zimbraMtaSmtpTlsSecurityLevel may- Use only the PLAIN or LOGIN mechanism
zmprov ms `zmhostname` zimbraMtaSmtpSaslSecurityOptions noanonymous- Point email out to the relay server with port 587.
zmprov ms `zmhostname` zimbraMtaRelayHost email-smtp.ap-southeast-1.amazonaws.com:587ms: Zimbra Modify Server.
- Restart Zimbra Service
zmcontrol restartThis is parameter before Modify Server.
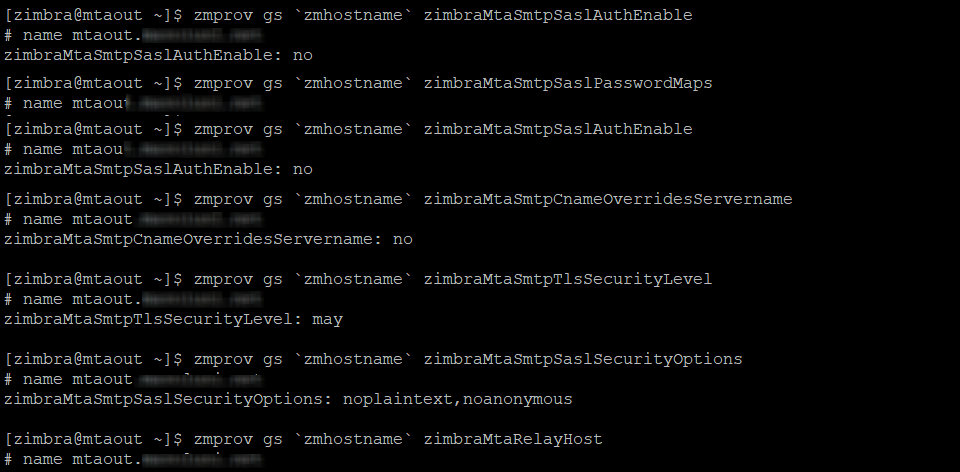
This is After Modify Server.

Step 3: Test Email Relay
Test the email relay to ensure that Zimbra can send emails through Amazon SES. You can use the Webmail to send a test email. See the Zimbra Log.